
MemberPress is our favorite plugin to create membership websites with minimum effort. It is safe, reliable, and easy to use. Make your website a member-only area and offer users better services and benefits to make a steady income from your pages.
How do you feel?
Many authoritative websites already implementing this strategy and lock their exclusive content based on membership levels. They will show the public only a fraction of the content and ask for payment to read further. As this is an effective way to make money, more websites are likely to replicate this pattern in the near future.
With MemberPress, you can easily create membership websites and collect payments from users. Connect it to your marketing tool or payment service through built-in integrations to automate your workflows and smoothen the process.
Whether you are going to run a niche forum or a marketing community, MemberPress has unique solutions to meet your needs. It is integrated with leading email marketing, analytics, payment, and affiliate gateways to utilize all possible opportunities and generate huge revenue from your business.
Today, we’ll tell you how to connect your MemberPress website to Zapier and automate the workflows.
Contents
Zapier
Zapier is a revolutionary digital service to automate workflows between web apps. Connect multiple apps that you want to work with, create a trigger to initiate the process, and configure follow-up actions to ensure everything is done without any manual intervention. It supports more than 2000 apps to reduce your workload and boost productivity.
Do you want to know how Zapier can automate the process in a MemberPress website?
Before digging into deep, let us check MemberPress pricing first.
MemberPress Pricing
MemberPress has three types of subscription plans,
| Basic | Plus | Pro |
| 1 website | 2 websites | 5 websites |
| Unlimited members | Unlimited members | Unlimited members |
| Unlimited membership levels | Unlimited membership levels | Unlimited membership levels |
| Custom registration forms | Custom registration forms | Custom registration forms |
| Full subscription management | Full subscription management | Full subscription management |
| Full transaction management | Full transaction management | Full transaction management |
| Unlimited access rules | Unlimited access rules | Unlimited access rules |
| Discount coupons | Discount coupons | Discount coupons |
| Lock files and content | Lock files and content | Lock files and content |
| Content dripping | Content dripping | Content dripping |
| Content access expiration | Content access expiration | Content access expiration |
| Payment setup | Payment setup | Payment setup |
| WordPress API | WordPress API | WordPress API |
| Automated reminder emails | Automated reminder emails | Automated reminder emails |
| Advanced security | Advanced security | Advanced security |
| Translation | Translation | Translation |
| AWeber | AWeber | AWeber |
| Constant Contact | Constant Contact | Constant Contact |
| GetResponse | GetResponse | GetResponse |
| MailChimp | MailChimp | MailChimp |
| MailPoet | MailPoet | MailPoet |
| Mailster | Mailster | Mailster |
| Math Captcha | Math Captcha | Math Captcha |
| MemberPress User Roles | MemberPress User Roles | MemberPress User Roles |
| PayPal | PayPal | PayPal |
| Stripe | Stripe | Stripe |
| Active Campaign | Active Campaign | |
| Amazon Web Services | Amazon Web Services | |
| BuddyPress | BuddyPress | |
| ConvertKit | BuddyPress | |
| Corporate Accounts | Corporate Accounts | |
| Developer Tools* | Developer Tools* | |
| Drip | Drip | |
| Authorize.net | Authorize.net | |
| Affiliate Royale | ||
| $249 | $399 | $549 |
*The Developer Tools add-on is required to integrate MemberPress with Zapier. So you should be a Plus or Pro member to utilize Zapier on your website.
Click this offer link to activate the deal and choose your MemberPress plan with up to $200 off (Limited period offer)
Installing Developer Tools Add-On in MemberPress
Follow these steps to install and activate the Developer Tools add-on on your website.
Sign into WordPress, expand the MemberPress menu from the left pane of your screen. Choose ‘Add-ons’. Find and activate the Developer Tools add-on from the list. It will add a new submenu (Developer) under the MemmberPress menu.
Log in to Zapier and search for MemberPress to connect.
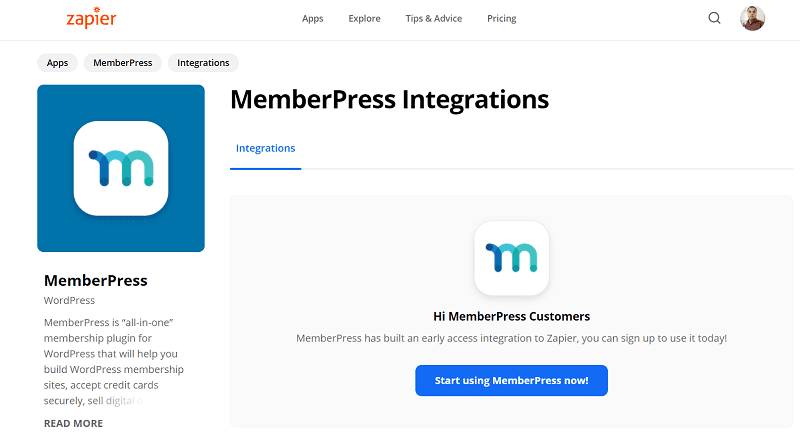
Enter your API key and Site URL in the pop-up box. Enter your URL with Http:// or https:// in the URL field. Don’t add the ending slash for the domain address. It will look like this now, https://www.example.com
You can find out the API key in MemberPress > Developer > Rest API. Copy and paste it to the window on Zapier to proceed. Click on continue to connect to MemberPress.
Once the connection is established, you can create zaps with MemberPress.
Click here to activate the deal and choose your MemberPress plan with up to $200 off (Limited period offer)
Creating zaps with MemberPress
It is very easy to create zaps and automate workflows on your MemberPress website. For instance, now we’re going to see how to automatically add a new (MemberPress) member to your MailChimp list.
Sign in to Zapier and click the ‘Create zap’ button to begin.
Choose a trigger app first.

Type ‘MemberPress’ in the Choose App field and select MemberPress from the suggestions. Then, you should choose a trigger event.
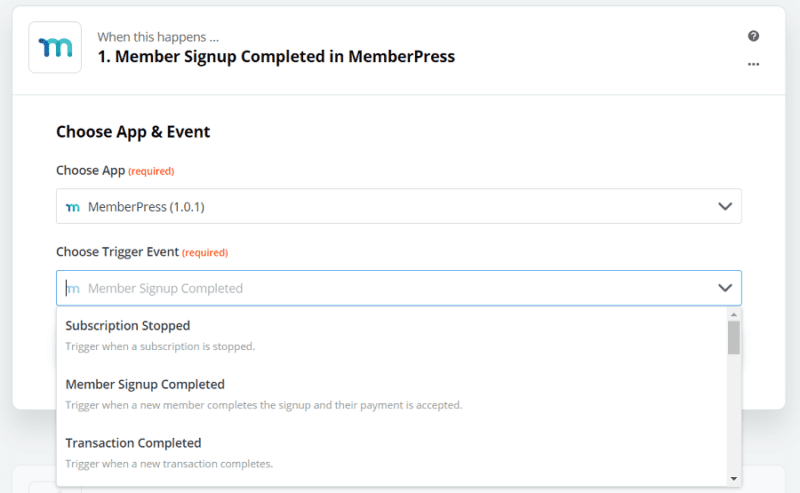
Choose the ‘Member Signup Completed’ event and click on continue. Now Zapier will ask you to connect to your MemberPress account if not done it already.
Sign into MemberPress using your API key, Site URL, and tap the continue button once again. Zapier will access your MemberPress account and collect sample details to set up your zap.
Create a MailChimp action as next.
In the Action app drop-down box, search for MailChimp and select it from the list.
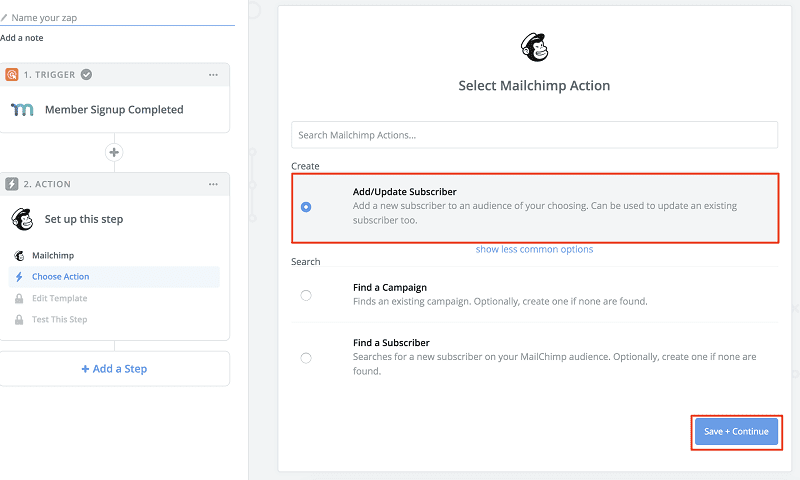
Choose ‘Add/Update Subscriber’ as an action that needs to be performed following the trigger event.
Click on ‘Save +Continue’.
Connect to your MailChimp account and configure fields for your new MemberPress subscribers.
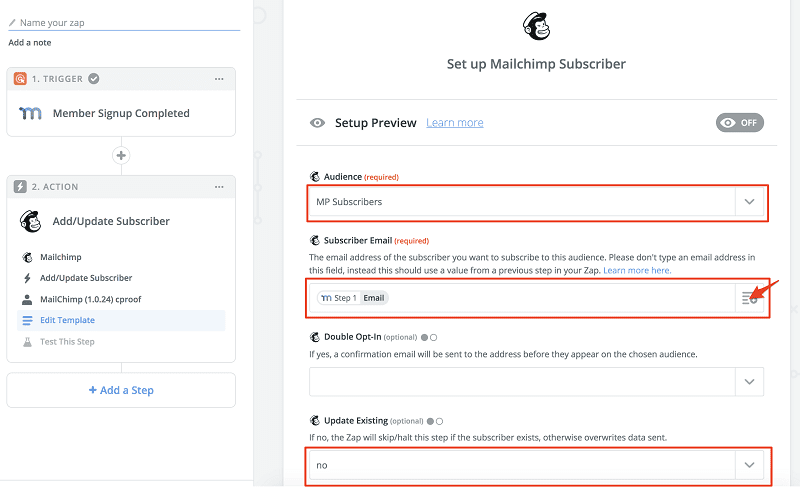
In the Audience field, choose your MailChimp list where you want to add new members. In the Subscriber Email field, select ‘Email’ value to collect and save the user’s email address in the list.
Scroll down again to configure other optional fields like first name, last name, etc. Finally, you can test to make sure everything is working fine and the test subscriber is added successfully to your MailChimp list.
Tap the ‘Send test to MailChimp’ button to run the test.
Once verified, click on Finish.
That’s it.
Don’t forget to assign a name to your zap. So you can easily identify it at a later moment.
Click this offer link to activate the deal and choose your MemberPress plan with up to $200 off (14-day money-back guarantee)